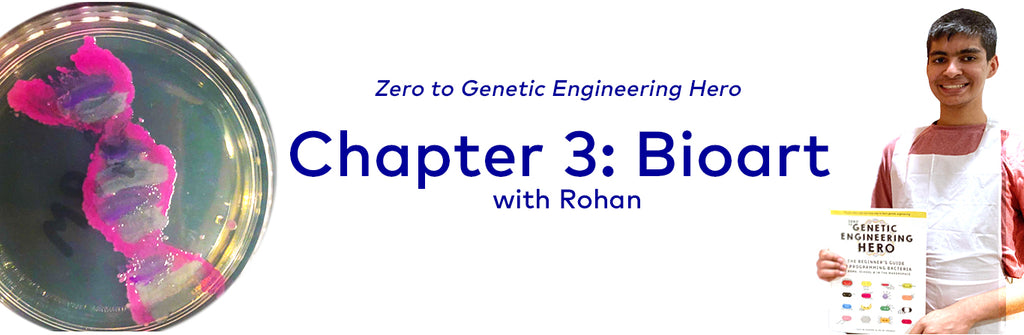

#3: My first bacteria painting with the Canvas Kit
By Rohan M.
They said I wasn’t an artist. Well, they were wrong. Maybe I’m not a painter, or a sculptor, or an illustrator. Maybe I’m not a photographer (ok, my photos aren’t that bad – I mean who do you think is taking all these pictures?) or a graphic designer. But I think it is now indisputable: I am a bioartist of the highest degree (and although Google’s squiggly red line would try and suggest otherwise, this is a very real and respectable profession). And you can be too! Because guess what? Bioartistic skill doesn’t correlate with traditional artistic skill at all! In fact, it uses my favorite form of artistic expression: tracing (YES, you heard me right). So if you need any more incentive to dive into the world of growing and culturing bacteria, trust me when I say your best (bio)artistic self is just a few incubation-cycles away.
But what is bioart exactly? Well, what is art? Is it painting or drawing? Is it knitting, crocheting, pottery, or woodworking? Or is it all of these things? Bioart is just as diverse, mind-boggling, and indescribable as traditional art. However, bioart is also inherently collaborative in a way that traditional art isn’t. A painter has only themselves to blame or praise for the quality of their work. But the same simply isn’t true for the bioartist. If you’ll forgive my philosophizing, bioart is best described as a calculated fall, an intentional surrender of artistic control to nature, in hopes that it will do things we can’t – build structures that our hands lack the grace to build, or produce patterns that they lack the patience to design. Bioart is an act of life shaping life, and there’s no way to truly do it justice other than experiencing it for yourself.
Here’s an example of just how wacky bioart can get! Above is a picture of artificial wings grown from porcine stem cells. The effort was led by the SymbioticA artistic laboratory, and image credits go to The Tissue Culture & Art Project. Take a look at their writeup about the project (and some more wild pictures!) here. Source: https://www.symbiotica.uwa.edu.au/

Ok </phliosophical_digression>. Today, we’re going to try our hand at some bacterial painting using the Canvas Kit. It will not only push our limits as synthetic biologists, but also give us ample room to exercise some more creative muscles – because, let’s be honest, strawberry-squashing is hardly enthralling work. The bacteria we’ll be working with today already have the necessary genes to produce differently colored pigments. In other words, the biological code we care about has already been written (i.e., created) and compiled (i.e., put inside the bacteria). What we need to do is figure out how to run it. For those of you who have written code on digital computers before, this might seem strange. After all, on these computers, running a piece of code more or less amounts to pressing a button. Running life on the other hand is a bit more difficult.
In almost all cases, the genes we put inside our bacteria are going to have certain safeguards. For instance, we don’t want to tell our bacteria to keep producing some protein – in this case, our pigments – at the expense of all the other functions they need to do to stay alive. If they have a limited amount of energy, then we don’t want them to waste any on our non-essential product, and risk dying. If our manufacturing process sometimes blows up our factory, then it’s hardly a good one! So the code inside our bacteria isn’t quite as simple as “make this purple-colored protein” but is instead more akin to “once you satisfy all your base needs, and have enough nutrients, energy, etc., then make this purple-colored protein”.
Remember, we can think of a cell like a factory that creates some product – the protein – based on its blueprints – the DNA. Source: Zero to Genetic Engineering Hero Figure 1.13

Right now, our bacteria are packaged in what is called a stab – they have some access to energy and nutrients, but just the bare minimum. As such, they are choosing to conserve their energy by eschewing the production of any pigment, kind of like a bear in hibernation – which is why they look colorless to us. So unless we want to paint some abstract interpretation of a snowstorm (and we don’t), we’re going to need to provide them with some more resources. We’re going to need to get them to grow!
We often tend to think of bacteria as these very alien things, but in reality, they are just like any other organism. To survive they need to satisfy two base needs: shelter and food. By shelter, I just mean a harmless surface for them to live and reproduce on. We’d like a substance that can easily be poured into our Petri dishes, can contain nutrients for our bacteria to take up upon contact, and will harden into something stable enough to support our bacteria, without being permanently adhered to the Petri dish. Something like Jell-O. Why not use Jell-O itself? Well, the bacteria will eat right through it. Luckily, there is a substance which has many of these same properties and is indigestible (at least for the bacteria we’re working with). It’s an invaluable component of any synthetic biology – or really, just biology – lab, and is known as agar.
Just a quick disclaimer before we get to the actual experiment: we won’t be following the Zero to Genetic Engineering Hero book word-for-word this time. That’s because over time, kit components change, and new tips, tricks, and instructions are added to make the experiments easier to complete. After all, science is constantly in flux – things we thought worked one way yesterday, we now know work a different way today! To save everyone from the headache that comes with releasing multiple volumes of the same text, Zero to Genetic Engineering Hero is not re-published to account for this new information. Instead the most up-to-date information for any kit can always be found in its official instruction manual, available at this link. If there’s ever a discrepancy between these two sources, it’s always a good idea to prefer the manuals over the book. That said, the book will provide you with more in-depth explanations and intuitions for the biology that makes all of these experiments possible, so it’s just as important to read.
OK, with that bit of housekeeping out of the way, it’s time to begin! Take a moment to gather up all your materials and put on your safety gear. You’ll notice that we have a small vial marked LB agar. And, unlike in math, names in biology pretty much mean what they say. LB agar really is just a combination of LB and agar, where LB (short for Lysogeny Broth) is a mixture of sugars, salts, and minerals that our bacteria will go crazy for. Currently, the mixture is in a powdery form, but to be able to pour it into our Petri dishes, we’ll need to convert it to its liquid, molten phase. Take out your sterile water bottle and heat it up in the microwave until it starts to boil. Usually, this will take about forty-five seconds, but make sure to keep a close eye on it. You’ll also want to unscrew the water bottle’s cap before microwaving it, to prevent any pressure from building up inside. Again, make sure the water really is boiling before you take it out – you should see bubbles!
Once it has reached a comfortable boil, quickly (and carefully, as it will be hot!) take out the sterile water bottle and pour in the LB agar powder. Don’t worry if some of the powder gets stuck to the edges of the vial, as there’s plenty to spare. Gently swirl the water bottle until the agar dissolves. Be careful not to mix too vigorously, and try to avoid sloshing the solution around, as this will lead to the formation of air bubbles. If you’re having trouble getting the agar to fully dissolve, then you likely let the water cool down too much before pouring the LB agar in. You’ll want to re-microwave the sterile water bottle back to a boil, but only in four second increments! If you keep it in too long, the solution will start foaming violently, rise to the top of the bottle, and begin to evaporate away (how can I describe this so well, you wonder? Certainly NOT because it happened to me…)!
Our sterile water bottle is now full with molten agar. But there’s one thing we haven’t considered yet. LB is a very tasty treat for many microorganisms, not just our bacteria. Though we’ve taken quite a few precautions – setting up in an environment with clean air, locking our DNA Playground during incubation, etc. – it’s always possible that a rogue agent could slip inside and contaminate our experiment. As a last line of defense, it would be nice if we could have a gatekeeper of sorts: some biological or chemical agent that would kill anything in our Petri dish that is not our bacteria.
But how? Enter antibiotic selection, one of those beautifully, brilliantly simple ideas in biology that almost makes you feel like you could have come up with it yourself. Essentially, the idea says that when we were inserting the genes to produce our product, we should also add in genes providing immunity to a certain antibiotic. Then, we can coat our agar with this antibiotic, and it will harm anything other than our bacteria (since they have genetic immunity against it)! In other words, we are selecting for our bacteria, hence the name antibiotic selection.
Reach inside your bag of materials and pull out the packet containing the antibiotic. Take out the pill and drop it into the LB agar solution, swirling the bottle like before until it dissolves. This can take up to five minutes, so be patient!
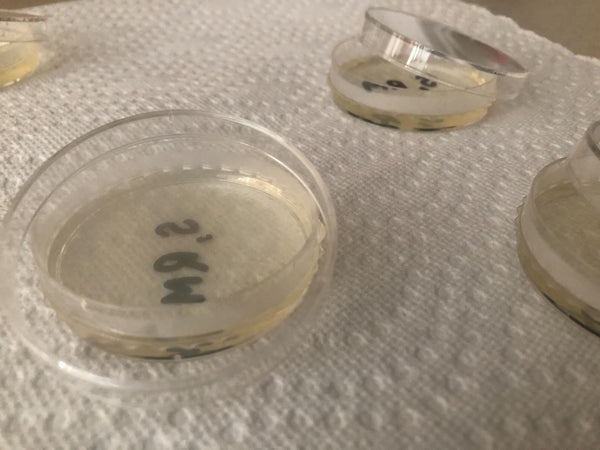
After you’ve boiled your agar, added in the antibiotic, and mixed it all together, you should be left with a yellowy solution that looks something like this. It smells!

OK, now it’s time to prepare our Petri dishes. Before we pour in our molten agar, it’s good to get in the practice of labeling our Petri dishes. Mark the bottom of each (the bottom is smaller than the top!) dish with an “S” (for selected) and your initials. It might seem a bit unnecessary for our simple experiment, but in more complex ones where some bacteria might not receive antibiotic, or we might be dealing with multiple antibiotics or combinations of antibiotics, knowing what substances each Petri dish has been treated with is crucial. So it’s just good to get in the habit of doing it. Next, pour each plate until it’s about halfway to two-thirds full, making sure to only cover each plate halfway with its lid, so that some heat can escape.
Now, it’s time to wait. The agar will take about 20 minutes or so to solidify. You’ll be able to tell when this process is complete, as the agar will have lost all of its yellowish tinge and will be completely transparent. If you’re still unsure, try holding a Petri dish above the page of a book. If the agar inside has fully solidified, none of the words should appear blurred or illegible. In the meantime, it’s a good idea to head over to your DNA Playground and start heating it to 37° C. This way, when it’s time to incubate our bacteria, it will have already gotten close to the proper temperature.
You must now let the agar in the petri dish solidify before you can use them.
Even after filling your Petri dishes, you might have some agar left over in your sterile water bottle. The sterile water bottle is a generic component of all the experiments we’ll be doing, so you’ll want to save it for later. I cannot stress this enough: make sure to pour any remaining agar in your water bottle into your inactivation bag immediately! You may, like myself, not realize that while you’re waiting for the agar in your Petri dishes to solidify, it will also solidify in your sterile water bottle….I still mourn that water bottle I lost that day!
By the way, so far I’ve just been referring to the microorganisms we’re going to culture as “bacteria,” but that’s hardly helpful — biologically speaking, it’s just about as useful as telling people your pet is an animal (which eliminates what….a pet rock?). In particular — don’t freak! — we’re going to be working with E. coli cells. While E. coli is often associated with disease and uncooked meat, there’s actually only a handful of strains that are pathogenic (not ours, obviously).
E. coli is a model organism for genetic engineering, because it’s so simple and easy to work with. In fact, it’s probably the best understood organism by humans today! In most cases, we can just stuff genetic material inside of it any which way, and it will read and execute it. That’s because, in contrast to mammalian cells, which are chock-full of complex organelles, the cellular landscape of E. coli is pretty desolate. It consists of a cellular membrane, free-floating, circular DNA (which we call a plasmid), some ribosomes to produce proteins, and that’s about it. It’s the equivalent of punchards from classical computing — simple, but limited. That said, we can still get a lot done with it!
The particular strain of E. coli we’re using is known as K12. It was first isolated at Stanford in the 1920s, and has been modified in two key ways that make it ideal for experimentation. The first is the removal of what is called an “F plasmid” (or Fertility factor plasmid). One amazing thing about E. coli (and many other bacteria) is that they are capable of horizontal gene transfer: genes can be exchanged between two bacteria even if they are not directly descended from one another. This process is known as bacterial conjugation and is mediated by microscopic “DNA bridges” (called pili) which sprout between two bacterium and allow them to pass little bits of their plasmids back and forth.
On the left, you can see what K12 E. coli really look like, under a microscope. On the right, you see a simplified diagram of a plasmid. As we mentioned, plasmids are minimal (only a few thousand bases long), circular genomes. We design plasmids with certain genes, and then introduce them into bacteria to execute the instructions encoded by these genes. Here, our plasmid has already been designed for us. Source: this paper by Nazemi, Elnaz & Hassen, Walid & Frost, Eric & Dubowski, Jan.

This ability is great for survival (since it allows quick sharing of beneficial traits), but it can lead to contamination during experimentation. For example, if our E. coli cells were capable of conjugation, then they might exchange the DNA required to produce their specific pigment, and start producing multiple pigments. I’m no art theorist, but mixing lots of colors is a big no-no, unless you’re aiming for brown.
The second key modification K12 E. coli have undergone is the removal of some virus DNA that is present in other E.coli strains. This way they won’t accidentally start producing viruses instead of our product during our experiment (yes, bacteria can get sick too!).
Caption: There are many different strains of E. coli, only a few of which are pathogenic. E. coli are ideal for synthetic biology because their cellular machinery is comparatively simple, making it easy to program them (and more difficult for us to make mistakes!). Source: Zero to Genetic Engineering Hero Figure 3-12, 3-13.


OK, that combination of history lesson plus synthetic biology horror story should’ve kept you busy while your agar solidified. Now, it’s time to move on to the next step: streaking! We’re going to be creating our “bacterial painting palette,” from which we can draw colors when we’re doing our actual painting later on. Take one of your Petri dishes and place it aside, sealing up the other three in the plastic bag they came in. We want to grow the differently colored bacteria somewhat separately, so that it’s easy to choose distinct colors during the painting process. Take one of the circular cardboard stencils that came with the Petri dishes and, using a Sharpie, divide it into as many sections as differently colored bacteria you have, marking each section with the color of bacteria you want to grow there (or, if you’re dubious about your ability to draw straight lines, you can try printing some pre-made templates from the Canvas Kit instructions).
Unwrap a yellow inoculating loop, and just barely dip its circular tip into a stab of bacterial cells. It should appear wet when you take it out, but there’s no need to double-dip — even if you can’t see them, your inoculating tube is now swarming with millions of K12 E. coli cells. Lightly trace the end of the inoculating loop in a zig-zag using the stencil you just made as a guide. This method is called streaking, and will allow us to grow a single bacterial colony. It’s a bit hard to tell if it’s working since you won’t see anything, but resist the urge to re-trace or push harder (remember, agar has the consistency of jello, so if you’re not careful you’ll puncture it!). After you’ve finished, immediately dispose of your loop in the inactivation bag, unwrap another, and repeat the above steps for all the differently colored bacteria you have.
It can be hard to tell if you’re really having any effect when using the inoculating loop – but resist the urge to double-dip, or press too aggressively. Trust me: your E. coli won’t pass up a chance at this tasty agar treat!

When you’re done, it’s time to incubate. Unlock the sliding door on the side of your DNA playground, and take out a humidity chamber. Place your Petri dish upside down (this will cause any condensation to form on the top of our dish, rather than on its delicate, bacteria-laden bottom), cover it with the humidity chamber, and place the Petri dish inside. Start the timer, and wait!

Time to incubate our cells at 37C.
Check back in about 24 hours — if you see concentrated color, then you can continue on with the experiment, but for best results (or if you don’t see any color yet) it’s recommended to wait for two days. If by this point you still don’t see any bacteria, you likely made a mistake! Don’t let that discourage you! Science is all about failing gracefully, and we have scientific mistakes to thank for everything from sticky notes to penicillin. While shooting for a mistake of that caliber might be a bit difficult, make sure to check the troubleshooting page in the manufacturing instructions for some insight into what went wrong. While it’s no fun in the moment, it will make you a better synthetic biologist in the long run, and save you from making the same painful blunder in more complicated and time-intensive experiments down the road.
Hopefully you were successful though! Time to take out your bacterial painting palette and….YES, color! Why did the bacteria become colored again? Well, once they had a stable enough food supply, the genes generating our pigment started to get transcribed, or converted from DNA into RNA. This RNA was then translated into a protein, some combination of smaller biochemical building blocks (or monomers) known as amino acids. While relatively simple by themselves, when composed together, amino acids form much more complex compounds (or polymers) known as proteins. The specific sequence of amino acids that defines each protein determines what shape the protein takes, and this shape determines how the protein interacts with light, and thus what color it is. If you still have questions, don’t worry! We’re going to go over the process of compiling and executing DNA programs in much more detail in our next experiment, when we actually write our own genetic code. For now, let’s continue to marvel at those brilliant pinks, iridescent purples, and calm cyans that we managed to produce.

 Our beautiful bacteria paint under blacklight and regular light.
With our creative juices flowing, it’s time to paint! If, like me, you border on being physically unable to draw, look up a simple drawing, and transcribe it onto one of the circular stencils you have left (obviously, you can just freehand if you’re so inclined). If, also like me, your imagination seems shrivel up when you actually have to put pen to paper, go with a classic design: a piece of double-stranded DNA.
Our “paintbrushes'' will be swabs. Assign each color swab to a different color of bacteria, dip them in, and begin to trace over your design. Even though the bacteria in the painting palette are colored, no color will show up in your art. This is weird! It’s like dipping your paint brush into a can of paint, seeing the paint on the brush, but then not seeing anything when you apply it to the canvas. So what’s going on here?
It turns out that the bacteria are too dilute to be visible, compared to the large amount of agar underneath them. But, aren’t they coming from agar? Why can we see them in one dish, but not the other? Well, look how much of our bacteria still stays on the swab. In the process of transferring the bacteria from our painting palette to our artwork, a lot of it is lost. But don’t be fooled – thousands of E. coli cells are being moved to our art dish. We just need to grow them so that they become visible. In some sense, what we’re doing right now is a “sketch” of our final piece – a light pencil drawing, rather than the fully fledged painting. Once you’re confident you’ve fully traced your image, incubate for another 24-48 hours, and then it's time for a critique. How did your art come out?
What do you think? Pretty meta, right – using DNA to generate the paint for my painting of DNA!

Maybe you got lucky (or are the undiscovered Picasso of the bioart world) and everything came out exactly how you pictured it. Chances are though, that what you see isn’t what you expected. Bacterial paint, quite literally, has a mind of its own. Painting inside the lines (the bane of my kindergarten existence) is no longer something you can always control! Even if your bioart is imperfect though, remember that it’s still infinitely cooler than basically all other art in the world. After all, don’t forget: it’s ALIVE!
While the E. coli making up our artwork aren’t pathogenic, we can’t just leave them lying around (unless you have the Keep-it Kit, then you can!), or else they might grow out of control. Throughout the experiment, you should’ve been throwing away all biological waste into your in activation bag – so, your agar, swabs, inoculating loops, stabs of bacteria, etc. Make sure to snap a few flattering photos of your Petri dish before you dump it in there as well. Add one sterile water bottle’s worth of bleach (~250mL) 4-6 bottle’s worth of water (~1L) to your inactivation bag, and let it rest for 24-48 hours. This will kill any remaining E. coli inside, so that we can safely dispose of all our used equipment. Clip the corner of the bag with a pair of scissors and flush all the liquids down a toilet. The solid waste (loops, dishes, etc.) can then be thrown in the trash.
It can sometimes be a pain to pack everything into an inactivation bag and dispose of it properly, but PLEASE MAKE SURE YOU DO! This is extremely important, not only for your health and the health of those around you, but because doing ethical bioscience is one of the core tenets of our Pledge!

So, what did we learn today? Bioart is fun, wacky, and deeply beautiful, but it’s also kind of hard. Acrylic paint won’t jiggle around when you turn your back on it, but our E. coli will. That said, I stick to what I said before – anyone can learn to do it, just like anyone can learn to do science. It requires practice and experimentation, and an intimate knowledge of biology. Perhaps the easiest thing you can do to instantly improve your artwork is stop repainting. There’s this very human urge to double-dip our loops and swabs, and retrace lines, since we can’t actually see our bacterial paint. The more we do this though, the more likely our bacteria are to go beyond where we want them to, making our artwork less precise.
While bioart is all fun and good, we also made incredible progress as synthetic biologists today! We learned how to culture K12 E. coli, and as a consequence, run genetic programs. Still not technically genetic engineering, I know, I know! But we’ll make good on our promise of “genetic engineering” when we compile and execute our first DNA program next time.
I want to point out one thing though. Experiments like this can be kind of complicated, and it’s easy to feel like you’re just going through the motions. If things don’t make sense to you? Ask questions! If you can’t find answers in the book, look them up, or reach out to us (by email or using the chat on our site)! The best scientists are always trying to figure out why things happen, as well as why they didn’t.
I hope you all are starting to realize just how amazing synthetic biology is. If you’re especially proud of your #agarart, be sure to post it on Twitter (and tag both Amino Labs @Aminobiolab and me @RohanMe93264078)! If you have any extra materials, it’s always a good idea to repeat the experiment, because the skills we’ve gone over today – streaking and culturing especially – are going to become the bread and butter of our synthetic biology workflow. And don’t forget to check back for Chapter 4, where we’ll put the “genetic engineering” in “genetic engineering hero!”